In today’s aesthetic medicine landscape, photography is more than just marketing—it’s a pillar of trust, education, and authenticity. Patients don’t choose surgeons based on credentials alone; they rely on before-and-after photos. According to Dr. Raghu Athre, a double board-certified facial plastic surgeon, better photos translate to more patients…
Let me tell you, he is no “ordinary” guy. He is spicy, and he does not hold back when speaking truth. Stating, “There are no excuses for bad before and after photos: to patients, qualifications mean absolutely nothing! The name of the game is better photos!!”
Raghu has been somewhat of a photography buff since high school, playing around with cameras and trying to take better photos. He really jumped into what he calls high-end before and after photography about 3 to 4 years ago.
The need for super high-end equipment is a myth. In this article/episode, you will also learn how you can create a photo-taking setup to take medically accurate professional photos for under $5,500.00.
The name of the game in 2025 is better photos.
“Today’s patients find me through Instagram. When I ask, ‘Did you check my qualifications?’ The answer is always ‘No.’ All the med school, residency, and fellowships for absolutely nothing! You can be upset about it, or you can play the game. The name of the game is better photos. Beautiful pictures equal amazing marketing and new patients. That’s a very easy calculation.” — Dr. Raghu Athre
What can Rolex or the Omega store teach us?
Both Raghu and Candace agree that the disparity between high-ticket procedures and the often lackluster before and after photos is pitiful. It’s time for practices to treat their images like high-end fashion brands do—carefully curated, professionally executed, and designed to captivate. The right images don’t just document results; they elevate the brand.
“I want surgeons to go to the Rolex store, go to the Omega store, go to a high-end luxury store. Get their brochure. Look at their marketing. Look at the photography. A Rolex costs $12,000. A facelift costs $35,000. It gives you perspective. You are “selling” something that people don’t need! Your photography better be relatively equivalent in quality!” ~ Raghu Athre, MD
Clinical photography requires accuracy, while marketing images allow for creativity. Both should be professional, but never misleading. Patients use them to form expectations. These images are marketing tools, legal documents, and educational materials.
Ultimately, it’s the surgeon’s responsibility. Leadership is top down. You are a surgeon, and you should hold yourself to some pretty high moral and ethical standards. “Today you can see the photo immediately. So, there are no excuses for a bad photo. Look at the photo and retake it when it is not perfect” said Raghu.
Raghu is more than happy to share his experience. He compares learning to take good photos to learning the violin. To learn the violin, you must learn a set of basic rules and become proficient at them. Then and only then you can “play a little” as you become more experienced. Practice, the equipment and your magical settings.
Practice, bring in a “model” over the weekend, get your magical settings and find what works for you. Raghu brought his dad in and took about 200 photographs that day with every possible setting. Once you find the ideal settings, print and frame them. Hang them on the wall where you take photos with the settings clearly written on them for easy reference.

Raghu’s system is simple and compact.
See links at the end of this article for links to find the equipment he uses on Amazon.
- Camera: Use a Sony Mirrorless Digital Camera, dedicated solely to patient photography. These cameras offer a built-in virtual level indicator and superimposed grid to ensure symmetry and alignment.
- Lens: Invest in a 70 mm lens to avoid distortion. This focal length provides a natural perspective, making it ideal for portraits and medical photography.
- Lighting: A wireless flash system prevents tangled wires and provides controlled, even lighting. A camera-attached adapter communicates with flash units, triggering them wirelessly when the shutter is pressed.
- Backdrops: Raghu recommends doing what you want but ditch the baby blue background. He chooses to use a light gray. You can use a roll of paper or paint the wall with an absolutely flat, no-sheen paint. Do not use a white background.
- Hard drive for storage: Dr. Athre catalogs his photos on a 12 TB external hard drive with built-in firewall protection. It backs up automatically every night to prevent data loss.
Master camera settings:
Understanding the core photography variables is crucial for consistency:
- Shutter Speed: Use a speed higher than 1/60th of a second to freeze motion.
- ISO: Start with 400 for a balance between light sensitivity and image quality.
- F-Stop: Use f/8 or f/9 to achieve adequate depth of field.
- White Balance: Adjust regularly to maintain color accuracy. Light conditions change over time, so recalibrate every three to four months.
- Adjust these settings to get the desired exposure.
Where to take your photos:
At the end of the hallway in Dr. Athre’s office is the designated spot for taking before-and-after photos. The strobes are mounted on the wall so that the light bounces downward. To achieve soft lighting rather than a direct, harsh glare, it’s best to use some form of diffusion in front of the strobe to break up the light slightly. Without diffusion, the lighting can become too harsh, resulting in bright white spots where the flash is overly intense.
When setting up a photography shoot near a window, avoid using it as a background to prevent unwanted lighting effects. Position flashes to overpower natural light and maintain control over exposure. Since daylight conditions change, adjust your shutter speed or f-stop as needed.
In bright conditions, use a higher f-stop (smaller aperture) to reduce light and prevent overexposure. In low light, use a lower f-stop (wider aperture) to let in more light. Always review your photo after taking it and make adjustments as needed.
Getting a consent. Hard or easy?
Raghu is a facial surgeon, he takes photos of faces close up. These are the hardest to get consents for. He has found that if he asks his staff to get the consent, it’s under 20% of patients that will give it, but if he asks, it’s over 95% that agree. He states, this is your practice. Own it.
Relaxed, comfortable patients yield better before and after photos.
The secret to better patient photos? It’s all about how they feel! It doesn’t hurt to use a little charm and sometimes even a little humor.
Photography sessions can be uncomfortable, especially in a clinical setting. If you’re asking a patient to stand there in crummy paper panties and equipment all over the place, your photos will not be as good.
To help put patients at ease (and get a better before and after photo) be friendly, use props such as a soft comfortable robe, some slippers and or a small heater to keep the patient warm. Small details can transform a sterile experience into a comfortable and even enjoyable one. Make the process a good one and patients will ask for their photos, then you can give them a take home album which can be great word-of-mouth marketing for you.
The Smartphone / iPad decision — let’s look at the science of it.
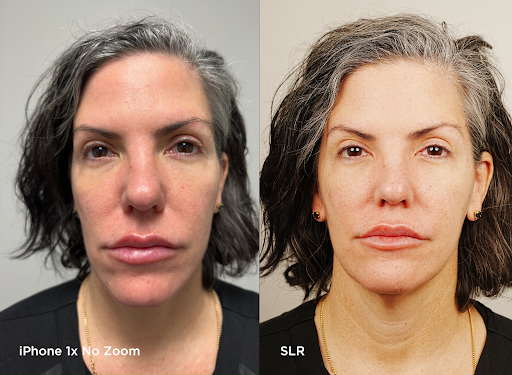
We regularly hear from smartphone users that they get amazing photos. They do, but they are not medically correct. By simple science, they cannot be. See examples below and decide for yourself.

Smartphones use wide-angle lenses (typically 24 mm–28 mm). This allows them to capture more of a scene in a single frame, making them great for landscapes, group photos, and general photography. However, wide-angle lenses can introduce distortion, especially around the edges, which can make faces or objects appear stretched or unnatural—particularly in close-up shots. It is simply not possible to get a photo without distortion using a wide-angle lens.
It’s easy but becomes difficult because then the question is, where do you securely store medical photos taken on a smartphone? Storage issues that come with a smartphone, produce a lot of problems which you will pay for sooner or later.
Schedule a “fun” day
Once you get the foundations down, then you can schedule a “fun” day when you get creative. Do some research. Learn from other people. Find poses you like and practice. Invite your patients to get all dressed up and come in; get creative and artsy fartsey. Put your clinical, medical photos in your gallery and use the creative, artsy photos for marketing.
Perfect Photo
Dr. Athre has been involved in developing Perfect Photo, a tool designed for quick and easy marketing photography that uses a smartphone but has proper storage solutions. While professional cameras remain the gold standard, Perfect Photo offers a convenient alternative for busy practices.
Raghu states that while professional equipment is ideal, Perfect Photo is a simpler solution for practices with high patient volumes.
Raghu encourages you to make a conscious decision that you want amazing clinical photographs and even offers to be available for a conversation if you want to call him.
By following this guide, plastic surgeons and their teams can dramatically improve their before-and-after photos, leading to better patient trust, stronger marketing, and, ultimately, more bookings. No excuses—start taking better photos today!
Quick Links: Dr. Athre’s Recommended Equipment
Camera: Sony Mirrorless Camera | Alternative
Lens: 70 mm Lens
Battery: Camera Battery
Flash System: Wireless Flash
Flash Mounting: Flash Mount
About: Dr. Raghu Athré is a top facial plastic surgeon in Houston, known for his precision and patient-focused approach. He earned an honors degree in Chemical Engineering from the University of Texas at Austin before graduating in the top 10% of his class at UT Southwestern Medical School, where he received the prestigious Hudson-Penn Award for surgical excellence.
After completing his residency in Otolaryngology and Head/Neck Surgery at UT Southwestern, he was selected for a competitive fellowship in Facial Plastic and Reconstructive Surgery under Dr. William Silver, a pioneer in the field.
Dr. Athré founded Athré Facial Plastics in Houston, combining his engineering mindset with advanced surgical techniques to deliver natural, aesthetically balanced results. He is widely published, lectures internationally, and has been recognized among RealSelf’s Top 500 doctors and H-Magazine’s Top Docs.
For more information, visit Athré Facial Plastics.
About Candace Crowe Design:
Since 1999, Candace Crowe Design has been a leader in aesthetic practice marketing across the U.S. and Canada, helping shape the way practices connect with patients—especially women. Known for their industry expertise, BRAG book, and Advantage Play®, CCD focuses on reducing patient acquisition costs while maximizing long-term patient value. With over 500 clients served, this family-owned business remains dedicated to innovation and success in the aesthetic industry.


